Breathing new life into an architectural treasure
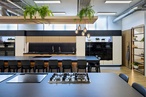
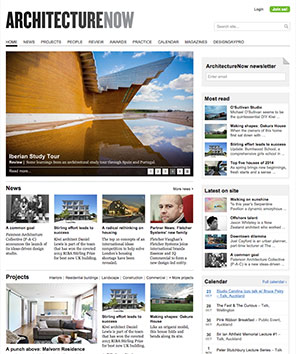
A birdseye view of the new roof on John Scott’s Futuna Chapel.
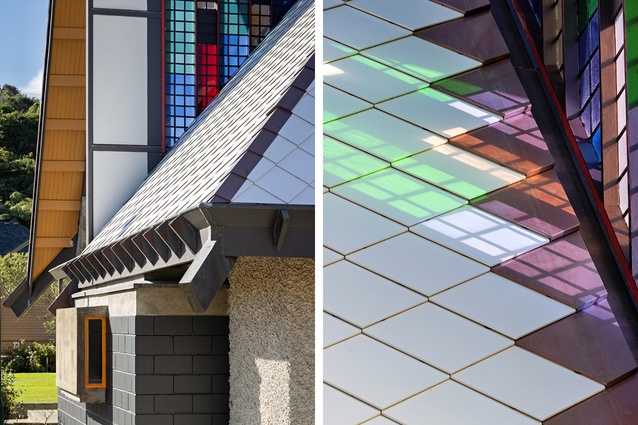
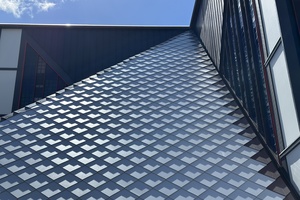
Birdseye of the hip roof.
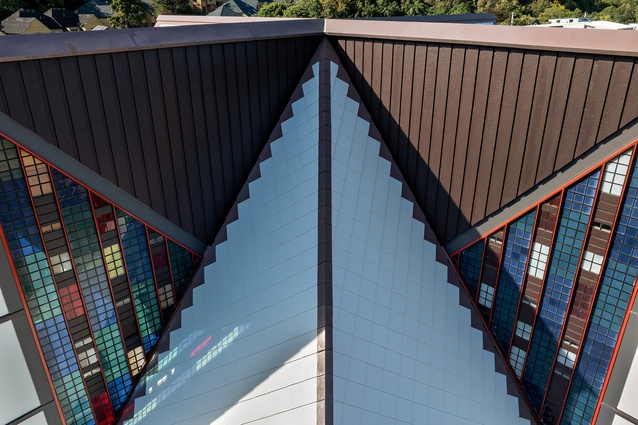
New valley flashing terminating in existing rainwater spout.
New serrated verge flashing.
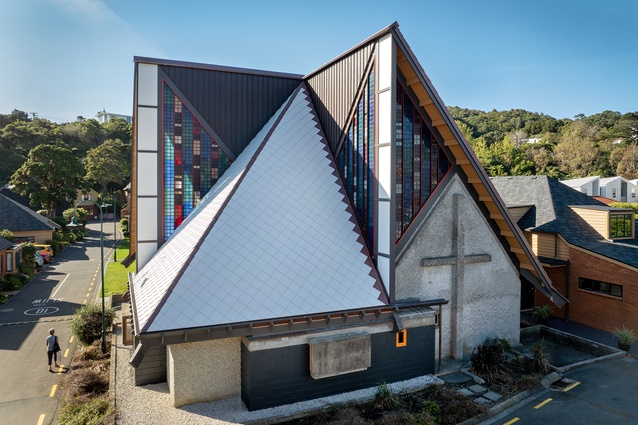
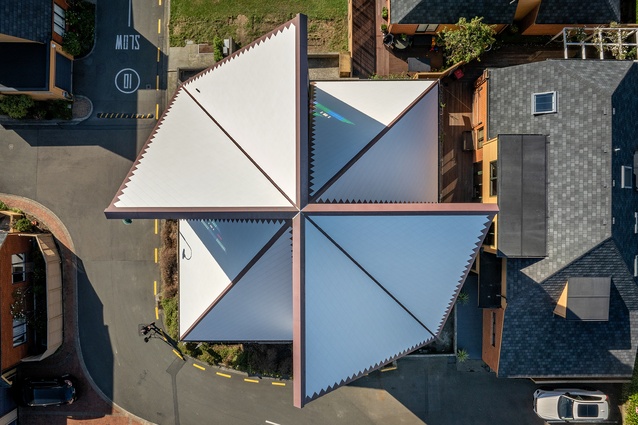
A birdseye of the south-east quarter.
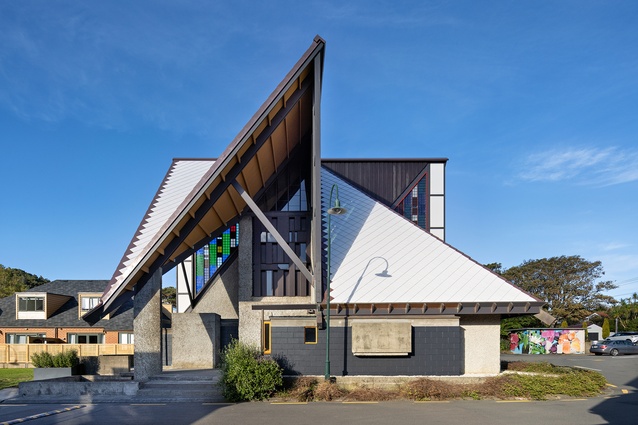
The south elevation.

South-east elevation.
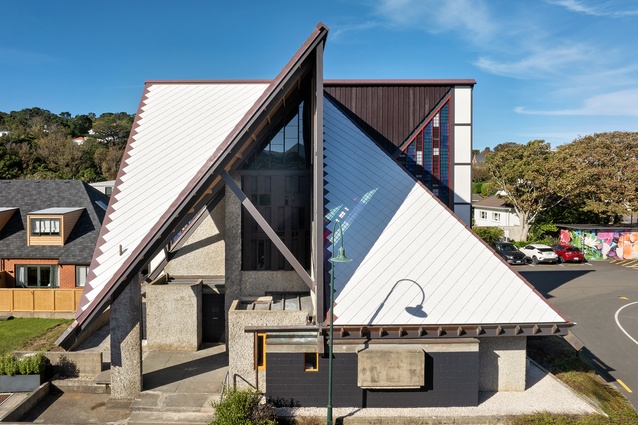
A birdseye view of the south elevation.

Futuna colour scheme.

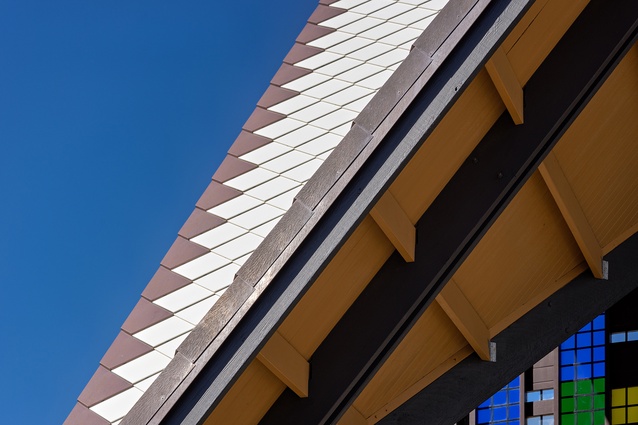
Detail of tile fixing, designed by Peter Parkes and Win Clarke.
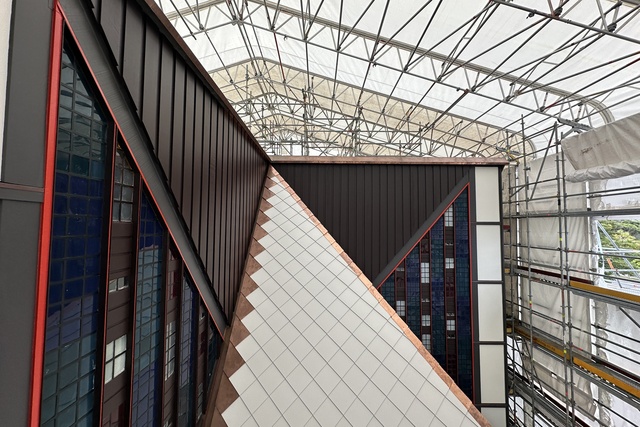
South gutter view and the new copper roof gutter at clerestory window sill.
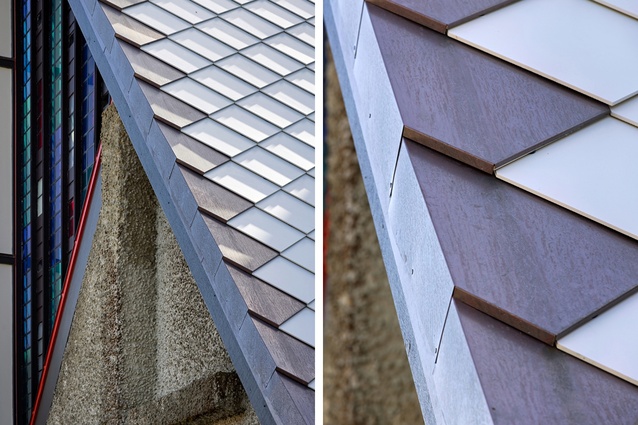
New roof verge and detail of the roof verge.
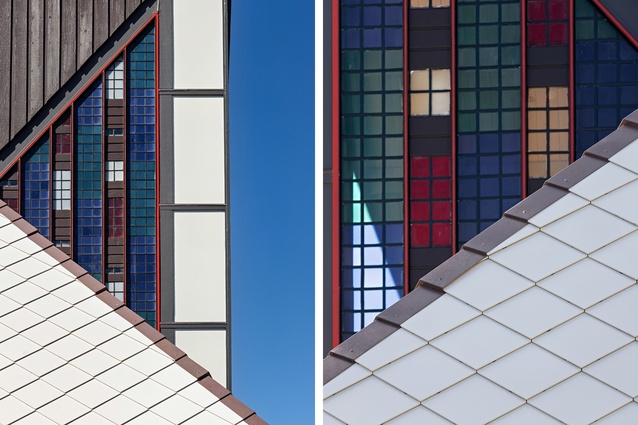
Clerestory window and roof fin wall, and hip roof ridge flashing detail.
With the Futuna Chapel set to reopen this Saturday 21 March after almost two decades of conservation work, restoration project architect and trustee Dr Peter Parkes shares his personal account of the work needed to reinstate this John Scott-designed taonga to its former glory.
My initial fascination in visiting the Futuna Chapel in Karori for the first time in the late 1970s, as an architecture student, has stuck with me to the present day. The visit piqued curiosity, pencil and paper were necessary to work out the mystifying geometry of the building, both simple and complex, square in plan. Architect John Scott, sculptor Jim Allen and the lay Marist brother builders had crafted an edifice of true elegance, inspirational architecture.
Then, much later, in 1994 as a nearby resident, while walking down Friend Street, I was alarmed to see the Hardies Asbestos Cement (AC) shingle roof with copper-edge flashings, being removed by people dressed in white boiler suits and breathing apparatus. With the resulting replacement of rectangular, stone chipped bituminous tiles, the roof appeared lifeless, without the vitality of its natal being. The building roof was put to sleep externally and remained dormant until recent months in 2026. The interior, contradictorily, remained lively. As it is regularly washed in coloured light, glorifying the sacred sanctuary for religious folk.
Dismay with the ‘dead roof’ motivated me to become a Trustee in Dec 2008. Luckily, I wasn’t alone with such thought. Other trustees, including the architect Nick Bevin, were similarly determined to reinstate the original white roof with similar materials, colour, tile pattern and copper edge flashings. This goal became a driving ambition for the Trust, though cost was formidable, reliant on charitable revenue.
A new roof would also help resolve other issues with the building; water leaks, ‘concrete cancer’, lively window mullions, a lively roof fin wall, and rotting structural timbers. There was regular need to replace wind dislodged bituminous tiles, address water leaks around the clerestory-coloured windows and those through the timber supports to the copper lined framed gutters. Leaking gutters were a source of dampness to the reinforced concrete beams over the four side altars. This resulted in the reinforcing steel rusting and sprawling the concrete. This presented an ongoing structural risk. So, a restoration project was set in motion with much attention to its preparation and set up. Substantial research had to be undertaken, a real interest of mine.
Notwithstanding this, Heritage Conservation Plans called for the roof to be reinstated as close as possible to the original Hardie AC tile and copper flashings. In 2018, now armed with an electronic ArchiCAD model of the building (drawn on wet Wellington Sunday afternoons), I set about preparing a set of design documents for repairing the roof and windows. LT McGuinness (LTM), who had undertaken the earlier repair work, provided a cost estimate to focus our minds.
During this time, significant exploration was undertaken in selecting material for the new tiles and exploring the scope of works relating to the acrylic-coloured windowpanes. The two amber colours had badly faded over the years and the use of new, longer lasting acrylic was investigated. Only one of the ambers could be sourced from Plexiglas in Germany whilst the second would have to be a special factory run; we only needed one sheet! Amber dyes used in the making of the acrylic are readily susceptible to degradation from UV light and Plexiglas guaranteed theirs for 15 plus years. Other suppliers’ amber colours proved to last only a month subject to New Zealand’s harsh UV light; tested on one’s own house windowsills.
The selection of a replicate material for the roof tiles wasn’t straightfoward. The original Hardie shingle had very good environmental qualities. It had lasted 33 years. If it’s then owners, the Society of Mary, hadn’t been spooked by the asbestos and troubled by water egress issues, it may have lasted considerably longer; especially if sealed in some way. Italian Laminam porcelain sheet, 6mm thick, imported by Laminex NZ, was chosen after considering many options; from metal, cement board, rubber, timber, glass, plastic to even bespoke shaped photovoltaic tiles. The shape, colour, longevity, weight and environmental resistant qualities were paramount, though the fragility of porcelain remained a key constraint. The AC shingles were also fragile, so we were not taking a greater risk in the selection of porcelain.
Roof loading calculations undertaken by our ‘go to’ engineer for heritage building engineer, Win Clark, verified that the existing roof structure at 50-degree slope was more than capable of taking the weight of 6mm porcelain tiles. We also envisaged that additional timber, added to the roof structure, in the way of battens and plywood, would help strengthen the roof.
It was now time to research the fixings and layout. The Trust engaged LTM to build a prototype model. The designed roof system used a drain cavity under the tiles. This was formed by counterpane timber battens on top of FiberTite, water resistant membrane adhered to plywood. The model was undertaken by Win Clark, Robbie McGreggor from LTM and me. None of us had previous experience with this type of roofing. LTM were unable to find tradespersons with specialist skills to do the job nor take on the risk. We knew, then, that we had a challenge on our hands and one that would involve a lot of design trial and error experimentation. We were forced by circumstance to go back to first principles of roof design. A real joy for an architect these days!
Prior to this, Win and I had undertaken a few investigations into the state of the Chapel, so we had a head start on the built object and had some sense of what we might encounter in this project. Win had undertaken structural studies of the Chapel, including, importantly, seismic and wind load capacity, and examination of all the steel timber joints in the interior of the building when its interior was fully scaffolded in 2014. We had also worked together on the rebuild and strengthening of the roof wing walls and had repaired a section of a rotten roof rafter at the junction of the insitu concrete bracing wall on the NE elevation.
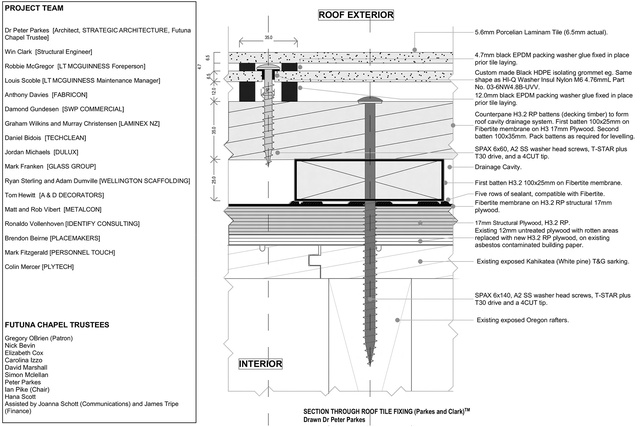
A considerable amount of investigation went into the fixings. At first, we considered using the traditional European fixings of copper clout nails and copper disk rivets that were used on the initial AC slate roof. We opted for German-made stainless steel SPAX screws. Our aim has been to make the roof last at least 100 years. In a bold move, we deleted the need for a lower fixing point in the tiles, one less hole to form and improved appearance. Win was satisfied that the porcelain was strong enough to resist uplift forces at the lower point of the tile. To reduce point load stress of the screw fixing through the tile, we customed designed and fabricated black HDPE isolating grommets. To isolate the screw head from the tile above it, we had special EPDM rubber washers made to pack the screw head and separate it from the upper tile.
Conscious of a potential clash of heights between the buildup of the new roof with the low height of the coloured clerestory windows above roof height, I designed new raking copper gutters to separate the two elements. The copper gutter also allowed us to improve on the flashings to the windowsills, which were long known for leaking. The model was displayed in the Chapel for several years and was the focus of much discussion and interest.
During this period, LTM was engaged to assist in leaking issues. It was discovered, to our dismay, that when we tested the weathertightness of the gutters, water flowed directly into the building. This added to the already discoloured interior timbers at the eaves. This leak area was probably one of the greatest sources of dampness that gave rise to the ‘concrete cancer’.
The next major moment in the fixing design was figuring out how to lay the tiles, so they didn’t aggregate into just a heap of porcelain. They needed to stagger in height up the 50-degree slope of the roof. We tried numerous times to make this work on the model. The only outcome then was frustration! In a somewhat desperate moment, I decided to try and make it work by doing successive sectional drawings in Archicad using and playing with numerous set-out principles. To our joint relief, I had discovered a system that would work and then we were able to replicate this in the physical model. The tiles had to be pitched at 3 degrees angle to the roof slope and spaced apart in small amounts. I discovered that it was best that the upper point of the tile aligned with the centre of the upper counterpane batten. The tiles, at the hole for their screw fixing, needed to be separated by a packing element. We then were able to specify the thickness of this washer as 12mm and used EPDM again. The washer would be held in place by the screw and in the eventual tile placement, this washer was glued in place. The builders had enough fixings already in their aprons. The mid region of the tiles sat on soft rubber bearings, isolating this region from the tile below. Effectively, we had invented a tile suspension system, not unlike the principles of base isolation in foundation engineering. This design reduces seismic forces on buildings. This was a huge breakthrough for us. Together with using Laminam porcelain as a roofing product, we were probably achieving world first design. Basic principles of design were in action – understanding the properties of materials and compensating for inherent weaknesses through design. For porcelain and its fragility, the aim here was to reduce point loading stresses.
A building contract was signed with LTM and work started in April 2025. The scaffolding was a piece of design excellence. There was minimal land around the building. A whole corner section of it was built over neighbours’ courtyards using trusses. Platforms were built over each of the roof planes and these stepped up the building. They had to be hung from the scaffolding roof trusses. A mezzanine scaffolded platform was built in the lofty porch. This proved an ideal storage and preparation area. All was covered in white shrink plastic that would eventually be recycled into new white shrink plastic.
All the 3,500 porcelain tiles were water jet cut from large-format Laminam sheets by METCON in Tawa. This required precise calibration and recalibration to maintain consistent 400 x 400mm tiles, the same size and shape as the original AC shingles. While on site, Robbie McGregor (LTM) was cleverly able to use Artificial Intelligence (AI) software on his phone. This enabled him to calculate tile numbers as the laying progressed. The world of construction is certainly changing fast!
During the project, we had a few surprises. The original building paper under the AC tiles didn’t fall into the gutters and ran under the copper lining instead. Moisture tracking down on the building paper was running into the interior of the building. This was a significant build fault. The copper linings to the gutters were nearly as ‘holey’ as the chapel interior! The copper was failing due to long-term thermal contraction and expansion. The plywood laid over the original building paper for the bituminous tiles wasn’t treated and had rotted in many areas. The exposed kahikatea T&G sarking under the roof was beginning to get water damaged, white residue patches visible to its underside. New replacement roofing was proving more than necessary to protect the rest of the building in the future. It was well overdue.
During demolition of the old bituminous roof, the discovery of asbestos in materials otherwise unknown was a major setback in time and cost. It was found in the original building paper, the putty used in the coloured clerestory windows and a black tar coating in the weatherboard wall cavities. Encapsulation was the only affordable means forward. The cost of removing all contaminated materials was well beyond the financial reach of the Trust.
Perhaps the most time-hungry discovery was the finding of considerable undulations of the roof planes. In some places it sagged 35mm. This was problematic for a new tile fixing that relied on just millimetres of tolerance. We used all opportunities for packing to get the roof planes level.
The tiles were carefully placed on the roofs using the knowledge gained in the prototype experiment. The first few rows were laid using a sheet template and then for the remainder, positioned by just centre lines projected up the roof. This all went smoothly under the stewardship of Robbie McGreggor and Ronnel Lavandero (both LTM). The lower pointy end of the valley roofs, where the waterspout starts, proved the most taxing. Overall, the prototype investment had certainly paid off.
The new copper flashings required a careful process. Unfortunately, there were no details of these in the original John Scott drawings. I had to simply work out size and shape by scaling off photos. Not ideal, but it worked. Anthony Davies (Ants) was responsible for all this copper origami on the job and there was a lot of it. His craft skills and meticulous attention to detail underpin much of the success here of the project. The process started by on site measurement using the contract drawings for design intent, mocking up a small piece (sometimes full templates in plastic sheeting) and examining this on site, remeasuring and preparation of fabrication drawings, checking these and then committing to fabrication in a workshop. To be sure, the first fabrication piece was brought to site and checked again, and then green lights were given for mass fabrication. We had to get it right and Ants did.
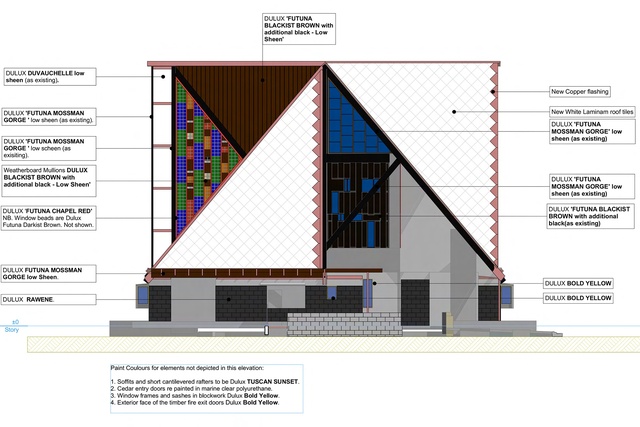
The paint colour scheme was another significant area of design research. Armed with the age-old conservation convention of using original colours, these were uncovered by poring over early colour photographs in zoom mode. I also engaged Dulux for laboratory testing and consulted with the Scott whānau. The building originally had its main timber stained black (mix of black paint and turpentine). Other timbers were simply oiled or varnished. To my delight, shared with Nick, I found a distinctive red pinstripe to the frames of the clerestory windows, once thought to be merely pink primer paint. The exterior then was not unlike the interior today. Unsurprisingly, this early coating system needed regular re-coating. It seemed that from the early ’70s onwards, the exterior was painted numerous times with oil-based coloured paints, then acrylics in later years. Many different colours were used as evident in the paint samples subject to laboratory analysis. Most notably, the clerestory window frames were painted white and remained so for many years. We are unsure if John Scott was involved in any of these later colour schemes.
In an earlier project, when the Trust refurbished the porch area in 2013, Nick and I tried to remove the paint from the T&G exposed kahikatea sarking but were unsuccessful. It was proving too labour intensive and costly for little heritage gain. The resultant 2026 paint scheme continued what we had done to the porch area and incorporated the findings from all our research. As most architects do, I needed an overriding concept to hang all the colours together and decided to stitch together a story, but that is for another time.
The exterior of the building has come alive again. Together with the new white tiles, new paint and copper flashings, the sun plays its part on the outside. It creates a variety of very interesting shadow patterns and, of course, the obligatory coloured light renderings on the sharp new tiles. The contradiction between the liveliness of the interior and the lifelessness of the former bituminous tiled roof has now been resolved. The building awakened from its slumber, fresh and energised for all to enjoy.
Overall, the project did prove a challenge at every step of the way, all details had to be reworked, often several times. Along with Win Clark, LTM with the unflappable Robbie McGreggor, Jerome Touzrad, Ronnel Lavandero and the rest of the crew, Ants Davies craftsman in copper origami (flashings), SWP, A&D Decorators, Wellington Scaffolding, Laminex NZ and Jordan Michaels (Dulux) painters and METCON plus others, we did it proud.

I must say to finish, that whilst the building is now looking spectacular again, I hope that my mentor architect John Scott and the sculptor Jim Allen would approve. The comradery of all the builders on site and the pleasure of working with Win Clark will be something that I will always fondly remember.
The project reached practical completion on 2 March 2026 with an event reopening planned for 21 March 2026. The Trust is delighted with the outcome and is hugely grateful to all the support and sponsors within New Zealand and afar. We still have a considerable sum to raise to make final payments, and all further help would be most appreciated.
Watch the live stream of the reopening of the Futuna Chapel this Saturday online here.